When working with Google Sheets, it is normal to type in a single cell more data than it can display in the default dimensions. The cell can hold it without a problem, but how it appears can change. There are three ways that can happen:
1. Overflow – this is where the content appears to overflow to the next cells. While it may obscure these neighboring cells, it technically remains in the original and can only be edited from there.
2. Text wrap – Wrapping is where the text is restrained to the horizontal dimensions of the cell and instead wraps around to a new line, just like in a paragraph. It can add the vertical width of the cell automatically to accommodate new lines.
3. Clip – Clipping means that the cell only displays what can fit within its normal dimensions and hides the rest. It appears once you click that cell – again, the text is there in the original cell, only you can’t see it.
If you want to maintain a long string of text in a single cell, we’re going to show you how to do two it in two simple ways. Before we proceed to the first step, keep in mind that you can always see what is happening in the cell by using the reference bar just below the menu options.
How to Wrap Text In Google Sheets
Using the “Format” Option
The easiest and most conspicuous way to do this is by using the “Format” option on the menu bar. Just follow the following steps:
1. Select the cell or range of cells for which you want to set a text-overflow option.
2. Click on the “Format” button on the menu bar. If you can’t see it, look to the extreme right of Sheets for a drop-down button to reveal the bar.
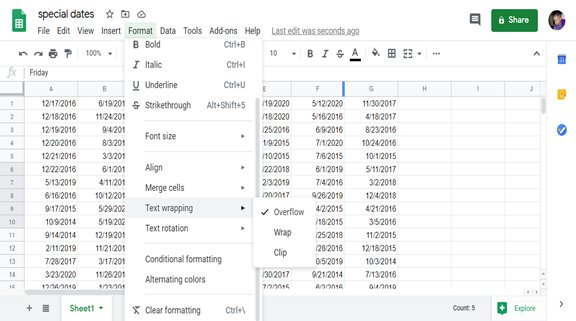
3. Scroll down to the “Text Wrapping” option and hover the pointer near the arrow to reveal the three options available: Overflow, Text Wrap, and Clip. Click on the appropriate one.
This option is also great for mobile devices.
Using the Text Wrap Icon
If you don’t care to use the long method above, there’s an even short one.
1. Select the cell or range of cells that you wish the changes to affect.
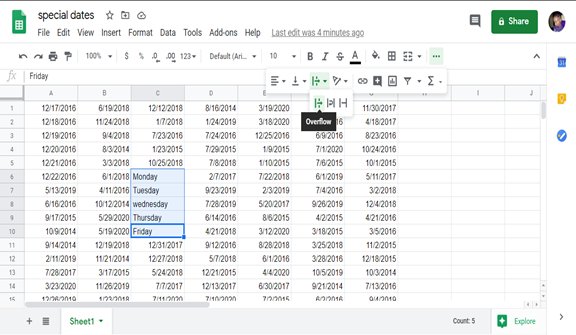
2. On the Menu bar, look for the Text Overflow icon. It looks like a vertical line with an arrow to its side pointing to the right, like in the figure below. If you can find it, click on the three dots to show more menu options. It can also be hidden if your window is not full screen, so try maximizing it.
3. Click on the icon to reveal three more with different shapes. The first is for text wrapping, the middle option for overflow, and the third for a clip.
That’s it! You can change these settings as much as you want for columns, rows, the whole worksheet, or for individual cells.